Building a Paytm-Style Payments Backend with Bun, TypeScript, Express & MongoDB Transaction

I'm Shubham (@shubhamsinghbundela), I'm a Software Engineer, a Full-stack developer, a tech enthusiast, and a technical writer here on @Hashnode. I have a strong zeal to share my acquired knowledge and I am also willing to learn from others.
Digital wallets have become a part of everyday life.
We transfer money to friends.
We split bills.
We pay merchants.
We check balances before making payments.
But behind every wallet application lies a backend system responsible for:
Authentication
Account Management
Balance Tracking
Secure Money Transfers
Transaction Safety
The real challenge isn't moving money — it's ensuring that every transfer is secure, consistent, and reliable.
What Are We Building?
A mini Paytm-style wallet backend where users can:
Create an account
Login securely
View wallet balance
Search other users
Transfer money
Maintain transaction consistency using MongoDB Transactions
Goal
To understand how modern payment systems work behind the scenes by building a simplified wallet application.
Instead of:
"Did the money get deducted?"
"Did the receiver get credited?"
"What happens if the server crashes during transfer?"
We move to:
"Transfers are atomic."
"Balances remain consistent."
"No money is lost during transactions."
Core Features
Authentication
Every user starts here.
Users can:
Sign up
Sign in
Receive JWT tokens
This ensures every request can be linked to an authenticated user.
Wallet Account
Every user automatically gets a wallet account.
When a user signs up:
User document is created.
Account document is created.
Initial balance is assigned.
Example:
User Collection
{
  "username": "shubham",
  "password": "hashed-password",
  "firstName": "Shubham",
  "lastName": "Singh"
}
Account Collection
{
  "userId": "userObjectId",
  "balance": 10000
}
View Balance
Authenticated users can view their current wallet balance.
Endpoint:
GET /api/v1/account/balance
Example Response:
{
  "balance": 5000
}
Money Transfer
Users can transfer money to other users.
Endpoint:
POST /api/v1/account/transfer
Request:
{
  "to": "receiverUserId",
  "amount": 100
}
Transfer Flow:
Identify sender
Find sender account
Find receiver account
Validate balance
Deduct amount
Credit receiver
Commit transaction
This guarantees transaction safety.
Technology Stack
For this project I decided to use:
Bun
TypeScript
Express
MongoDB
Mongoose
JWT Authentication
Zod Validation
bcrypt
MongoDB Transactions
Why Bun?
Fast package manager
Fast runtime
TypeScript support out of the box
Simple developer experience
Project Structure
backend/
│
├── index.ts
│
└── src/
    ├── app.ts
    ├── config/
    │     └──
    ├── routes/
    │   └── user.ts
    │
    ├── controller/
     │   └── user.ts
    │
    ├── service/
    │   └── user.ts
    │
    └── types/
    │   └── user.ts
    │
    ├── middleware/
    │   └──
    │
    └── types/
    │   └── user.ts
    │
    │
    └── model/
        └── user.ts
I intentionally separated:
Routes
Controllers
Services
Types
to keep the application maintainable as it grows.
Step 1: Initialize Bun Project
Create a new Bun project:
bun init
Choose:
Blank project with TypeScript
Bun automatically creates:
package.json
tsconfig.json
index.ts
Step 2: Install Dependencies
Install Express:
bun add express
Install MongoDB dependencies:
bun add mongoose
Install TypeScript types:
bun add -d @types/express
Step 3: Create Express Application
Create:
src/app.ts
import express from "express";
import authRoute from "./routes/user";

const app = express();

app.use(express.json());

app.get("/v1/health", (req, res) => {
  res.status(200).json({
    message: "Health is Good",
  });
});

export default app;
Step 4: Server Entry Point
Create:
index.ts
import app from "./src/app";
import connectDB from "./src/config";

const PORT = process.env.PORT || 3000;

const start = async () => {

  app.listen(PORT, () => {
    console.log(
      `Server is running at \({PORT} in \){process.env.NODE_ENV} mode`
    );
  });
};

start().catch((err) => {
  console.error("Failed to start server", err);
  process.exit(1);
});
Responsibilities:
Connect database
Start server
Handle startup failures
Step 5: Setup MongoDB Connection
Create:
src/config/db.ts
import mongoose from "mongoose";
import dns from "dns";

dns.setServers(["1.1.1.1", "8.8.8.8"]);

const url: string | undefined = process.env.DATABASE_URL;

const connectDB = async () => {
  if (url) {
    const conn = await mongoose.connect(url);

    console.log(
      `MongoDB connected: ${conn.connection.host}`
    );
  } else {
    throw new Error(
      "DATABASE_URL is not defined"
    );
  }
};

export default connectDB;
Initially, I tried connecting to MongoDB (cloud) but faced a DNS issue
Problem:
MongoDB connection was failing due to DNS resolution.
Fix:
After watching a YouTube video: , I added this:
const dns = require("dns");
dns.setServers(["1.1.1.1", "8.8.8.8"]);
This fixed the issue and I was able to connect to cloud MongoDB.
Update index.ts :
import app from "./src/app";
import connectDB from "./src/config/db";

const PORT = process.env.PORT || 3000;

const start = async () => {
  await connectDB();
  app.listen(PORT, () => {
    console.log(`Server is running at \({PORT} in \){process.env.NODE_ENV} mode`);
  });
};

start().catch((err) => {
  console.error("Failed to start server", err);
  process.exit(1);
});
Understanding TypeScript's Strictness
While setting up the project, I noticed TypeScript forcing me to handle cases that plain JavaScript would ignore.
Example:
const url: string | undefined =
  process.env.DATABASE_URL;
Why?
Because environment variables may not exist.
TypeScript understands that:
process.env.DATABASE_URL
can return:
string | undefined
This means we must explicitly verify it before using it.
if (url) {
  await mongoose.connect(url);
}
This prevents runtime crashes caused by missing environment variables.
One thing I started realizing while learning TypeScript is that it's not only about handling:
string
number
boolean
object
It also forces us to think about:
undefined
null
optional values
before the code reaches production.
Step 6: Standard API Response Structure
Create:
src/utils/apiResponse.ts
import { type Response } from "express";

class ApiResponse {
  static ok(res: Response, message: string, data: any = null) {
    return res.status(200).json({
      success: true,
      message,
      data,
    });
  }
}

export default ApiResponse;
Why This is Important
Instead of writing:
res.status(200).json({ message: "Success" });
To avoid repeating response logic across multiple APIs, I implemented a reusable utility using the DRY (Don't Repeat Yourself) principle:
ApiResponse.ok(res, "Success", data);
Why Use type Response?
You might notice this import:
import { type Response } from "express";
By specifying Response, TypeScript knows that res is an Express response object.
For example, when typing:
res.
TypeScript can suggest methods like:
res.status()
res.json()
res.send()
res.cookie()
and immediately report errors if we try to use methods that don't exist.
The type keyword is also important:
import { type Response } from "express";
It tells TypeScript that this import is only needed for type checking and should not be included in the generated JavaScript code.
Step 9: Standard API Error Structure
While building APIs, handling errors properly is as important as handling success responses.
- Create Custom Error Class
src/utils/apiError.js
class ApiError extends Error {
  statusCode: number;
  // Inherit from built-in JavaScript Error
  constructor(statusCode: number, message: string) {
    super(message);

    this.statusCode = statusCode;

    // Capture clean stack trace
    Error.captureStackTrace(this, this.constructor);
  }

  static badRequest(message = "Bad Request") {
    return new ApiError(400, message);
  }

  static forbidden(message = "Forbidden") {
    return new ApiError(403, message);
  }

  static notFound(message = "Not Found") {
    return new ApiError(404, message);
  }

  static unauthorized(message = "401 Not Authorized") {
    return new ApiError(401, message);
  }
}

export default ApiError;
Why Extend Error?
avaScript provides built-in errors like:
ErrorTypeErrorReferenceError
But they don’t include HTTP status codes, which are required in APIs.
2. Global Error Middleware
Create:
src/middleware/errorMiddleware.ts
import { type Request, type Response, type NextFunction } from "express";
import ApiError from "../utils/apiError";

interface Error {
  statusCode?: number;
  status?: number;
  message?: string;
  name?: string;
}

const errorHandler = (
  err: Error,
  req: Request,
  res: Response,
  next: NextFunction,
) => {
  // Handle known (custom) errors
  if (err instanceof ApiError) {
    return res.status(err.statusCode).json({
      success: false,
      message: err.message,
    });
  }

  if (err.name === "JsonWebTokenError") {
    return res.status(401).json({
      success: false,
      message: err.message,
    });
  }

  if (err.name === "TokenExpiredError") {
    return res.status(401).json({
      success: false,
      message: err.message,
    });
  }

  // Handle unknown errors
  return res.status(500).json({
    success: false,
    message: "Internal Server Error",
  });
};

export default errorHandler;
Learning About unknown While Building Error Middleware
While creating the global error middleware, I initially came across examples where the error parameter was typed as:
const errorHandler = (
  err: unknown,
  req: Request,
  res: Response,
  next: NextFunction,
) => {
At first, this confused me.
I wanted to access properties like:
err.message
err.name
err.statusCode
but TypeScript immediately reported errors.
After some research, I learned that unknown means:
"TypeScript doesn't know what value is stored here."
The value could be:
"Something went wrong"
or
404
or
new Error("Database Error")
Since TypeScript cannot guarantee what the value actually is, it prevents us from accessing properties directly.
To solve this, I introduced an interface describing the structure of the errors I expected to handle:
interface Error {
  statusCode?: number;
  status?: number;
  message?: string;
  name?: string;
}
Then I updated the middleware:
const errorHandler = (
  err: Error,
  req: Request,
  res: Response,
  next: NextFunction,
) => {
Now TypeScript understood that these properties might exist:
err.message
err.name
err.statusCode
This helped me understand an important TypeScript concept:
JavaScript often assumes values have certain properties and only fails at runtime if that assumption is wrong.
TypeScript asks us to either:
Verify what the value is (
typeof,instanceof, etc.)Or explicitly describe the expected shape using types or interfaces.
Although it felt strict at first, it helps catch many mistakes while writing code instead of discovering them later in production.
3. Register Middleware in App
Update src/app.ts:
import express from "express";
import authRoute from "./routes/user";
import accountRoute from "./routes/account";
import errorHandler from "./middleware/errorMiddleware";
import cookieParser from "cookie-parser";

const app = express();

app.use(express.json());

app.use(cookieParser());

app.get("/v1/health", (req, res) => {
  res.status(200).json({
    message: "Health is Good",
  });
});


app.use(errorHandler);

export default app;
This must be the last middleware in the app.
Final Error Flow
Request → Route → Controller → Service → throws ApiError → Passes to errorHandler middleware → JSON response
Step 10: Request Validation Using Zod
Before writing any business logic, I wanted to validate incoming request data.
Imagine a user sends:
{
  "email": "abc",
  "password": "123"
}
Without validation, invalid data reaches our service layer and database.
The goal is:
Request
   ↓
Validation
   ↓
Controller
   ↓
Service
   ↓
Database
Invalid requests should be rejected as early as possible.
Why Zod?
After exploring the Zod documentation, I learned that it provides:
Runtime validation
Type safety
Friendly error messages
TypeScript integration
Install Zod:
bun add zod
Create User Validation Schema
Create:
src/schema/user.ts
import { z } from "zod";

export const userSignupSchema = z.object({
  email: z.email(),

  password: z
    .string()
    .min(8, "Password must be at least 8 characters long")
    .regex(/[A-Z]/, "Password must contain at least one uppercase letter")
    .regex(/[a-z]/, "Password must contain at least one lowercase letter")
    .regex(/[0-9]/, "Password must contain at least one number")
    .regex(
      /[^A-Za-z0-9]/,
      "Password must contain at least one special character"
    ),

  firstName: z.string(),

  lastName: z.string(),
});
Now every signup request must satisfy these rules before reaching our business logic.
Step 11: Creating a Reusable Validation Middleware
While searching for best practices, I came across a blog explaining how to integrate Zod with Express middleware.
Instead of validating inside every controller, I created a generic validation middleware.
Create:
src/middleware/validationMiddleware.ts
import {
  type Request,
  type Response,
  type NextFunction,
} from "express";

import { z, ZodError } from "zod";

export function validateData(
  schema: z.ZodObject<any, any>
) {
  return (
    req: Request,
    res: Response,
    next: NextFunction
  ) => {
    try {
      schema.parse(req.body);

      next();
    } catch (error) {
      if (error instanceof ZodError) {
        const errorMessages =
          error.issues.map((issue) => ({
            message: issue.message,
          }));

        res.status(400).json({
          error: "Invalid data",
          details: errorMessages,
        });
      } else {
        res.status(500).json({
          error: "Internal Server Error",
        });
      }
    }
  };
}
Why Middleware?
Middleware allows validation to happen before the controller executes.
Flow:
Request
   ↓
Validation Middleware
   ↓
Controller
   ↓
Service
This keeps controllers focused on handling requests and responses rather than validation.
Using Validation Middleware
router.post(
  "/signup",
  validateData(userSignupSchema),
  controller.signup
);
Now:
Invalid Request
      ↓
Validation Middleware
      ↓
400 Response

Valid Request
      ↓
Controller
      ↓
Service

Step 11: Defining Signup Routes
Now that request validation was in place, the next step was connecting incoming requests to the appropriate controller.
Create:
src/routes/user.ts
import { Router } from "express";

import * as controller from "../controller/user.ts";
import { validateData } from "../middleware/validationMiddleware.ts";
import { userSignupSchema } from "../schema/user.ts";

const router = Router();

router.post(
  "/signup",
  validateData(userSignupSchema),
  controller.signup,
);

export default router;
Understanding the Request Flow
When a user sends a signup request:
POST api/v1/user/signup
the flow becomes:
Request
   ↓
Route
   ↓
Validation Middleware
   ↓
Controller
   ↓
Service
   ↓
Database
The route's responsibility is very simple:
Define the endpoint
Register middleware
Forward the request to the controller
Business logic should never live inside routes.
Creating the Controller Layer
Create:
src/controller/user.ts
import {
  type Request,
  type Response,
  type NextFunction,
} from "express";

import * as userService from "../service/user.ts";

import type { SignupInput } from "../types/user";
import ApiResponse from "../utils/apiResponse.ts";

const signup = async (
  req: Request<{}, {}, SignupInput>,
  res: Response,
  next: NextFunction,
) => {
  try {
    const user = await userService.signup(req.body);

    ApiResponse.ok(
      res,
      "User successfully Created",
      user,
    );
  } catch (error) {
    next(error);
  }
};

export { signup };
At this point, I started exploring TypeScript more deeply and came across several concepts that were initially confusing.
Why Import Request, Response, and NextFunction?
One of the first questions I had was:
Why am I importing these types when Express works perfectly without them in JavaScript?
import {
  type Request,
  type Response,
  type NextFunction,
} from "express";
The answer is type safety.
These types help TypeScript understand:
What
reqcontainsWhat
rescan doWhat
next()represents
For example:
req.body
req.params
req.query

res.status()
res.json()
are now fully typed.
Another thing I learned was the use of the type keyword:
import { type Request } from "express";
This tells TypeScript that the import is only required during type checking and should not be included in the generated JavaScript.
Understanding SignupInput
I also created a dedicated type describing the signup payload.
Create:
src/types/user.ts
export type SignupInput = {
  email: string;
  password: string;
  firstName: string;
  lastName: string;
};
Initially I wondered:
Zod is already validating the request. Why create another type?
The reason is that Zod and TypeScript solve different problems.
Zod validates data at runtime.
TypeScript validates code while we're developing.
This type describes exactly what data the signup service expects to receive.
Instead of treating:
req.body
as an unknown object, TypeScript now understands:
req.body.email
req.body.password
req.body.firstName
req.body.lastName
and provides autocomplete and error checking.
Understanding Express Request Generics
Another line that caught my attention was:
Request<{}, {}, SignupInput>
At first it looked strange.
After exploring the Express type definitions, I learned that Request accepts generic parameters:
Request<
  Params,
  ResponseBody,
  RequestBody,
  Query
>
In our case:
Request<{}, {}, SignupInput>
means:
Params       → {}
ResponseBody → {}
RequestBody  → SignupInput
Query        → Default
The most important part is:
SignupInput
because it tells TypeScript that:
req.body
must match the structure defined in our signup type.
This means TypeScript can catch mistakes while writing code instead of waiting until runtime.
Creating the User Model
Now that requests were validated and typed correctly, it was time to persist users in MongoDB.
Create:
src/model/user.ts
import mongoose from "mongoose";

const userSchema = new mongoose.Schema(
  {
    firstName: {
      type: String,
      required: true,
      trim: true,
    },

    lastName: {
      type: String,
      required: true,
      trim: true,
    },

    email: {
      type: String,
      required: true,
      unique: true,
      lowercase: true,
      trim: true,
    },

    password: {
      type: String,
      required: true,
    },
  },
  { timestamps: true },
);

const userModel = mongoose.model(
  "users",
  userSchema,
);

export default userModel;
Implementing Signup Business Logic
Now that the route, controller, validation, and database schema were ready, it was time to implement the actual signup functionality.
Create:
src/service/user.ts
import accountModel from "../model/account";
import userModel from "../model/user";

import type { SignupInput } from "../types/user";

import ApiError from "../utils/apiError";

const signup = async ({
  email,
  password,
  firstName,
  lastName,
}: SignupInput) => {
  const userExist = await userModel.findOne({
    email,
  });

  if (userExist) {
    throw ApiError.forbidden(
      "User Already Exists",
    );
  }

  const hashedPassword = await bcrypt.hash(
    password,
    10,
  );

  const newUser = await userModel.create({
    firstName,
    lastName,
    email,
    password: hashedPassword,
  });

  await accountModel.create({
    userId: newUser._id,
    balance: 100,
  });

  return {
    userId: newUser._id,
    firstName: newUser.firstName,
    lastName: newUser.lastName,
    email: newUser.email,
  };
};
Responsibility of the Service Layer
The service layer contains the application's business logic.
In our signup flow, the service is responsible for:
Checking whether the user already exists
Hashing the password
Creating the user
Creating a wallet account
Returning a safe response
This keeps the controller clean and focused only on handling requests and responses.
Final Result: Testing /v1/user/signup API Using Postman

Step 12: Implementing SignIn
Now that users can create accounts, the next step is allowing them to securely authenticate and access protected APIs.
For this project, I implemented:
Access Tokens
Refresh Tokens
The idea is simple:
User Signs In
      ↓
Access Token (short-lived)
      ↓
Access Protected APIs

Refresh Token (long-lived)
      ↓
Generate New Access Tokens
This approach is commonly used in modern applications because it improves security while maintaining a good user experience.
Creating JWT Utilities
Create:
src/utils/jwt.ts
import jwt, { type SignOptions, type JwtPayload } from "jsonwebtoken";

import { Types } from "mongoose";

type Payload = {
  userId: Types.ObjectId;
};

const accessSecret = process.env.JWT_ACCESS_SECRET!;
const refreshSecret = process.env.JWT_REFRESH_SECRET!;

const generateAccessToken = (payload: Payload): string => {
  try {
    return jwt.sign(payload, accessSecret, {
      expiresIn: process.env.JWT_ACCESS_EXPIRES_IN || "15m",
    } as SignOptions);
  } catch (error) {
    throw error;
  }
};

const generateRefreshToken = (payload: Payload): string => {
  try {
    return jwt.sign(payload, refreshSecret, {
      expiresIn: process.env.JWT_REFRESH_EXPIRES_IN || "7d",
    } as SignOptions);
  } catch (error) {
    throw error;
  }
};

const verifyAccessToken = (token: string) => {
  try {
    return jwt.verify(token, accessSecret) as JwtPayload;
  } catch (error) {
    throw error;
  }
};

const verifyRefreshToken = (token: string) => {
  try {
    return jwt.verify(token, refreshSecret) as JwtPayload;
  } catch (error) {
    throw error;
  }
};

export {
  generateAccessToken,
  generateRefreshToken,
  verifyAccessToken,
  verifyRefreshToken,
};
Another TypeScript Learning Moment
While implementing JWT, I encountered several TypeScript errors.
Initially I expected this to work:
jwt.sign(payload, secret, {
  expiresIn: "15m",
});
However TypeScript complained about the options object.
After reading the documentation and exploring GitHub issues, I learned that the third parameter expects a specific type.
So I imported:
import { type SignOptions }
  from "jsonwebtoken";
and updated the code:
jwt.sign(payload, secret, {
  expiresIn: "15m",
} as SignOptions);
This tells TypeScript:
This object follows the structure expected by jsonwebtoken.
Understanding the Non-Null Assertion Operator
Another thing that stood out was:
const accessSecret = process.env.JWT_ACCESS_SECRET!;
Notice the exclamation mark:
!
This is called the Non-Null Assertion Operator.
Without it, TypeScript sees:
process.env.JWT_ACCESS_SECRET
as:
string | undefined
because environment variables may not exist.
By adding:
!
I'm telling TypeScript:
I know this value exists.
If the environment variable is actually missing, the application will fail at runtime.
For production projects, a safer approach is usually validating environment variables during application startup.
Understanding JwtPayload
While implementing token verification, I hit another TypeScript issue.
Initially I wrote:
jwt.verify(token, accessSecret);
TypeScript complained because the return type of jwt.verify() is not always obvious.
After reading the documentation, I learned that verify() can return multiple types depending on the payload.
To help TypeScript understand the returned structure, I imported:
import { type JwtPayload } from "jsonwebtoken";
and used:
jwt.verify( token, accessSecret ) as JwtPayload;
Now TypeScript understands that the decoded token contains JWT payload information.
This was another example of TypeScript forcing me to be explicit about the types I'm working with.
Implementing Signin Route
With JWT utilities ready, users can now authenticate.
Define the route:
router.post(
  "/signin",
  validateData(userSigninSchema),
  controller.signin,
);
Controller Layer
const signin = async (
  req: Request,
  res: Response,
  next: NextFunction,
) => {
  try {
    const {
      accessToken,
      refreshToken,
      user,
    } = await userService.signin(
      req.body,
    );

    res.cookie(
      "refreshToken",
      refreshToken,
      {
        httpOnly: true,
        secure:
          process.env.NODE_ENV ===
          "production",
        maxAge:
          7 * 24 * 60 * 60 * 1000,
      },
    );

    ApiResponse.ok(
      res,
      "Signin Successful",
      {
        accessToken,
        user,
      },
    );
  } catch (error) {
    next(error);
  }
};
The controller is responsible for:
Calling the service
Setting the refresh token cookie
Returning the access token
The business logic remains inside the service layer.
Signin Service
const signin = async ({
  email,
  password,
}: SigninInput) => {
  const userExist =
    await userModel.findOne({
      email,
    });

  if (!userExist) {
    throw ApiError.forbidden(
      "User Not Found",
    );
  }

  const correctPassword =
    await bcrypt.compare(
      password,
      userExist.password,
    );

  if (!correctPassword) {
    throw ApiError.forbidden(
      "Password is invalid",
    );
  }

  const accessToken =
    generateAccessToken({
      userId: userExist._id,
    });

  const refreshToken =
    generateRefreshToken({
      userId: userExist._id,
    });

  return {
    accessToken,
    refreshToken,
    user: {
      userId: userExist._id,
      firstName:
        userExist.firstName,
      lastName:
        userExist.lastName,
      email: userExist.email,
    },
  };
};
Signin Flow
The complete signin flow now looks like:
POST /v1/user/signin
  ↓
Route
  ↓
Validation Middleware
  ↓
Controller
  ↓
Find User
  ↓
Compare Password
  ↓
Generate Access Token
  ↓
Generate Refresh Token
  ↓
Store Refresh Token Cookie
  ↓
Return Access Token
At this stage, users can successfully authenticate and receive JWT tokens that will be used to access protected wallet APIs.
Final Result: Testing /v1/user/signin API Using Postman

Step 13: Implementing Refresh Route Flow
After implementing signin, users can receive:
Access Token
Refresh Token
However, access tokens are intentionally short-lived.
In this project:
Access Token → 15 minutes
Refresh Token → 7 days
This improves security because even if an access token is compromised, it becomes useless after a short period of time.
But this introduces a new challenge:
What happens when the access token expires?
We don't want users to sign in again every 15 minutes.
This is where refresh tokens become useful.
Refresh Token Flow
The idea is simple:
User Signs In
      ↓
Access Token (15 min)
Refresh Token (7 days)
      ↓
Access Token Expires
      ↓
Client Calls /refresh
      ↓
New Access Token Generated
The user remains logged in without entering credentials again.
Defining the Route
Create the refresh endpoint:
src/routes/user.ts
router.post("/refresh", controller.refresh);
Whenever the frontend detects that the access token has expired, it can call:
POST /v1/user/refresh
to obtain a new access token.
Controller Layer
src/controller/user.ts
const refresh = async (
  req: Request,
  res: Response,
  next: NextFunction,
) => {
  try {
    const { accessToken } =
      await userService.refresh(
        req.cookies.refreshToken,
      );

    ApiResponse.ok(
      res,
      "Token refreshed successfully",
      { accessToken },
    );
  } catch (error) {
    next(error);
  }
};
The controller remains very small.
Its responsibility is simply:
Read refresh token from cookies
Call the service layer
Return a new access token
The business logic remains inside the service.
Refresh Service
src/service/user.ts
const refresh = async (
  token: string,
) => {
  if (!token) {
    throw ApiError.unauthorized(
      "Refresh token missing",
    );
  }

  const decoded =
    verifyRefreshToken(token);

  const userExists =
    await userModel.findOne({
      _id: decoded.userId,
    });

  if (!userExists) {
    throw ApiError.notFound(
      "User Not found",
    );
  }

  const accessToken =
    generateAccessToken({
      userId: userExists._id,
    });

  return { accessToken };
};
Complete Refresh Flow
The final refresh flow looks like:
POST /v1/user/refresh
          ↓
Read Refresh Token Cookie
          ↓
Verify Token
          ↓
Find User
          ↓
Generate New Access Token
          ↓
Return Access Token
Final Result: Testing /v1/user/refresh API Using Postman

Step 14: Protecting Routes with Authentication Middleware
Now that users can:
✅ Sign Up
✅ Sign In
✅ Refresh to get Access Tokens
The next step is protecting private APIs.
For example:
GET /v1/user/getme
This endpoint should only be accessible to authenticated users.
To achieve this, I created an authentication middleware.
Defining the Route
router.get(
  "/getme",
  authMiddleware,
  controller.getMe,
);
Notice the middleware:
authMiddleware
It runs before the controller.
The request flow becomes:
Request
    ↓
Auth Middleware
    ↓
Controller
    ↓
Response
If authentication fails, the controller never executes.
Creating Authentication Middleware
import {
  type Request,
  type Response,
  type NextFunction,
} from "express";

import userModel from "../model/user";

import ApiError from "../utils/apiError";

import {
  verifyAccessToken,
} from "../utils/jwt";

const authMiddleware = async (
  req: Request,
  res: Response,
  next: NextFunction,
) => {
  try {
    const token =
      req.headers.token as string;

    if (!token) {
      throw ApiError.unauthorized(
        "Access token missing",
      );
    }

    const decode =
      verifyAccessToken(token);

    const userExists =
      await userModel.findOne({
        _id: decode.userId,
      });

    if (!userExists) {
      throw ApiError.notFound(
        "User Not found",
      );
    }

    req.userId = decode.userId;

    next();
  } catch (error) {
    next(error);
  }
};

export default authMiddleware;
Middleware Responsibilities
The middleware is responsible for:
Reading the access token
Verifying the JWT
Checking whether the user exists
Attaching the user id to the request
Passing control to the next middleware
If any step fails, the request is rejected.
Another TypeScript Learning Moment
While implementing this middleware, I ran into an interesting TypeScript error.
When I wrote:
req.userId = decode.userId;
TypeScript complained:
Property 'userId' does not exist on type 'Request'
At first this was confusing because JavaScript allows us to attach new properties to objects at runtime.
However, TypeScript only knows about the properties defined in Express's Request interface.
By default, Express's Request type does not contain:
req.userId
Why TypeScript Complained
TypeScript sees Request as:
interface Request {
  body: any;
  params: any;
  headers: any;
}
There is no:
userId
property defined.
So TypeScript correctly reports an error.
From TypeScript's perspective:
"You are trying to use a property that I don't know exists."
Extending Express Request Type
After researching the issue and reading documentation, I learned that Express types can be extended globally.
Create:
src/types/express/index.d.ts
import express from "express";

declare global {
  namespace Express {
    interface Request {
      userId?: string;
    }
  }
}
This tells TypeScript:
Every Express Request may contain a userId property.
Understanding declare global
This was my first time encountering:
declare global
It allows us to extend existing TypeScript definitions.
Normally Express provides:
interface Request {}
We are effectively adding:
interface Request {
  userId?: string;
}
to that existing definition.
After doing this, TypeScript understands:
req.userId
throughout the entire application.
Updating tsconfig.json
I also needed to ensure TypeScript could discover custom type definitions.
{
  "compilerOptions": {
    "typeRoots": [
      "./src/types",
      "./node_modules/@types"
    ]
  }
}
This tells TypeScript where to search for custom type declarations.
Implementing Get Me API
With authentication middleware in place, implementing the Get Me endpoint becomes straightforward.
The route:
router.get(
  "/getme",
  authMiddleware,
  controller.getMe,
);
Controller Layer
const getMe = async (
  req: Request,
  res: Response,
  next: NextFunction,
) => {
  try {
    const userId = req.userId;

    if (!userId) {
      throw ApiError.unauthorized(
        "Unauthorized User",
      );
    }

    const { user } =
      await userService.getMe(
        userId,
      );

    ApiResponse.ok(
      res,
      "User get successfully",
      { user },
    );
  } catch (error) {
    next(error);
  }
};
Notice that the controller never verifies JWTs.
That responsibility belongs entirely to the middleware.
The controller simply consumes:
req.userId
which was already attached by the authentication middleware.
Service Layer
src/service/user.ts
const getMe = async (
  userId: string,
) => {
  const userExist =
    await userModel.findOne({
      _id: userId,
    });

  if (!userExist) {
    throw ApiError.notFound(
      "User Not found",
    );
  }

  return {
    user: {
      userId: userExist._id,
      firstName:
        userExist.firstName,
      lastName:
        userExist.lastName,
      email:
        userExist.email,
    },
  };
};
Final Get Me Flow
GET /v1/user/getme
          ↓
Auth Middleware
          ↓
Verify JWT
          ↓
Find User
          ↓
Attach userId to Request
          ↓
Controller
          ↓
Service
          ↓
Return User Profile
Final Result: Testing /v1/user/getme API Using Postman

Step 15: Implementing Logout
After implementing:
Sign Up
Sign In
Refresh to get access token
get Me
the final authentication feature was logout.
The goal of logout is simple:
User Logged In
      ↓
Refresh Token Stored in Cookie
      ↓
User Clicks Logout
      ↓
Refresh Token Removed
      ↓
Session Ends
Defining the Route
router.get("/logout", authMiddleware, controller.logout );
I decided to protect this route using:
authMiddleware
This ensures only authenticated users can log out.
Controller Layer
const logout = async (
  req: Request,
  res: Response,
  next: NextFunction,
) => {
  try {
    res.clearCookie("refreshToken");

    ApiResponse.ok(
      res,
      "Logout Success",
    );
  } catch (error) {
    next(error);
  }
};
Unlike signup or signin, logout doesn't require any business logic.
The controller simply:
Removes the refresh token cookie
Returns a success response
Understanding clearCookie
The most important line is:
res.clearCookie("refreshToken");
When users signed in, the refresh token was stored inside an HTTP-only cookie:
res.cookie(
  "refreshToken",
  refreshToken,
  {
    httpOnly: true,
    secure:
      process.env.NODE_ENV ===
      "production",
  },
);
Logout removes that cookie from the browser.
After the cookie is removed:
Browser
    ↓
No Refresh Token
    ↓
Cannot Request New Access Tokens
As a result, once the current access token expires, the user must sign in again.
Why Access Tokens Are Not Removed
A common question is:
If logout removes the refresh token, what about the access token?
The access token is typically stored on the client side (for example, memory or local storage).
The backend cannot directly remove it.
Instead:
Logout
    ↓
Refresh Token Deleted
    ↓
Access Token Eventually Expires
    ↓
User Must Login Again
Since access tokens are short-lived (15 minutes in this project), the session naturally ends.
Logout Flow
The complete flow looks like:
GET /v1/user/logout
          ↓
Auth Middleware
          ↓
Verify User
          ↓
Clear Refresh Token Cookie
          ↓
Return Success Response
At this stage, the authentication system is fully functional.
Step 16: Implementing Money Transfer Using MongoDB Transactions
Why Money Transfer Is Difficult
At first glance, transferring money looks simple.
Suppose:
Shubham → ₹100 → Rahul
You might think:
Deduct ₹100 from Shubham
Add ₹100 to Rahul
Done
But what happens if the server crashes after deducting money from Shubham and before adding it to Rahul?
Shubham Balance = ₹1000
Rahul Balance = ₹500

Transfer ₹100

Step 1:
Shubham = ₹900

Server crashes

Rahul = ₹500
Now ₹100 has disappeared from the system.
This creates an inconsistent database state.
In payment systems, this is unacceptable.
Understanding Transactions
While researching this problem, I spent time reading about MongoDB transactions.
Good Read: https://medium.com/henkel-data-and-analytics/understanding-transactions-in-mongodb-9832badd98ea
https://levelup.gitconnected.com/mongodb-transactions-in-node-js-a-comprehensive-guide-7f8bc4d363a6
The key idea is:
Either every operation succeeds or none of them succeed.
This property is called Atomicity.
Think of it as an all-or-nothing operation.
Transaction Starts
        ↓
Deduct Money
        ↓
Add Money
        ↓
Commit
If any step fails:
Transaction Starts
        ↓
Deduct Money
        ↓
Error Occurs
        ↓
Rollback Everything
The database returns to its original state.
No money is lost.
Defining Transfer Types
Before implementing the transfer API, I created a dedicated TypeScript type for the request body.
Create:
src/types/account.ts
export type transferInput = {
  to: string;
  amount: number;
};
The transfer endpoint expects:
{
  "to": "receiverUserId",
  "amount": 100
}
So the transferInput type accurately describes the shape of the data required for a money transfer.
Defining the Route
router.post(
  "/transfer",
  authMiddleware,
  controller.transfer,
);
This route is protected because only authenticated users should be allowed to transfer money.
Controller Layer
const transfer = async (
  req: Request<{}, {}, transferInput>,
  res: Response,
  next: NextFunction,
) => {
  try {
    const userId = req.userId;

    if (!userId) {
      throw ApiError.unauthorized(
        "Unauthorized User",
      );
    }

    const data =
      await accountService.transfer(
        userId,
        req.body,
      );

    ApiResponse.ok(
      res,
      "transferDone",
      data,
    );
  } catch (error) {
    next(error);
  }
};
Just like previous controllers, the responsibility here is minimal:
Get authenticated user id
Call service layer
Return response
All business logic stays inside the service.
Service Layer
src/service/account.ts
import mongoose from "mongoose";

import accountModel from "../model/account";
import ApiError from "../utils/apiError";
import type { transferInput } from "../types/account";

const transfer = async (userId: string, { to, amount }: transferInput) => {
  const session = await mongoose.startSession();

  try {
    session.startTransaction();
    const senderAccount = await accountModel.findOne({ userId }, null, {
      session,
    });

    if (!senderAccount) {
      throw new ApiError(404, "Sender account not found");
    }

    const receiverAccount = await accountModel.findOne({ userId: to }, null, {
      session,
    });

    if (!receiverAccount) {
      throw new ApiError(404, "Receiver account not found");
    }

    if (senderAccount.balance && senderAccount.balance < amount) {
      throw new ApiError(400, "Insufficient balance");
    }

    await accountModel.updateOne(
      { userId },
      {
        $inc: {
          balance: -amount,
        },
      },
      { session },
    );

    await accountModel.updateOne(
      { userId: to },
      {
        $inc: {
          balance: amount,
        },
      },
      { session },
    );

    await session.commitTransaction();

    return {
      success: true,
    };
  } catch (error) {
    await session.abortTransaction();
    throw error;
  } finally {
    await session.endSession();
  }
};

export { transfer };
Starting a MongoDB Session
Inside the service:
const session = await mongoose.startSession();
A session allows MongoDB to track multiple operations as part of a single transaction.
Starting the Transaction
session.startTransaction();
From this point onward, MongoDB treats all database operations as part of the same transaction.
Nothing is permanently saved until we explicitly commit.
Finding Sender Account
const senderAccount =
  await accountModel.findOne(
    { userId },
    null,
    { session },
  );
Notice:
{ session }
This is important.
It tells MongoDB:
Execute this query inside the current transaction.
Without attaching the session, the query would execute outside the transaction.
Finding Receiver Account
const receiverAccount =
  await accountModel.findOne(
    { userId: to },
    null,
    { session },
  );
Again, we execute this query inside the same transaction.
Deducting Money From Sender
await accountModel.updateOne(
  { userId },
  {
    $inc: {
      balance: -amount,
    },
  },
  { session },
);
MongoDB's $inc operator allows us to increment or decrement numeric values.
Example:
Current Balance = ₹1000

$inc: {
  balance: -100
}

New Balance = ₹900
Crediting Receiver
await accountModel.updateOne(
  { userId: to },
  {
    $inc: {
      balance: amount,
    },
  },
  { session },
);
Example:
Current Balance = ₹500

$inc: {
  balance: 100
}

New Balance = ₹600
Committing the Transaction
Once both updates succeed:
await session.commitTransaction();
MongoDB permanently saves all changes.
Sender Updated
Receiver Updated
Commit
The transfer is complete.
Handling Failures
If any step throws an error:
catch (error) {
  await session.abortTransaction();
  throw error;
}
MongoDB rolls back every operation performed inside the transaction.
Example:
Deduct Sender Money
        ↓
Database Error
        ↓
Abort Transaction
        ↓
Sender Balance Restored
This guarantees consistency.
Cleaning Up Resources
Whether the transaction succeeds or fails:
finally {
  await session.endSession();
}
The session must always be closed.
This prevents resource leaks and keeps MongoDB connections healthy.
Complete Transfer Flow
POST /v1/account/transfer
            ↓
Auth Middleware
            ↓
Get Sender ID
            ↓
Start Session
            ↓
Start Transaction
            ↓
Find Sender
            ↓
Find Receiver
            ↓
Validate Balance
            ↓
Deduct Sender Balance
            ↓
Credit Receiver Balance
            ↓
Commit Transaction
            ↓
Success Response
This was the first time I worked with database transactions, and it completely changed how I think about financial operations.
Before learning transactions, I saw money transfer as two database updates.
After learning transactions, I realized that a transfer is actually one logical operation made up of multiple database operations that must succeed together.
Final Result: Testing /v1/account/transfer API Using Postman

Step 17: Fetching All Users Except the Logged-in User
To power the members dashboard in the frontend application, I added a protected endpoint that returns all users except the currently authenticated user.
Route
router.get("/getAllUsers", authMiddleware, controller.getAllUsers);
Since this route is protected by authMiddleware, only authenticated users can access it.
Controller
The controller retrieves the authenticated user's ID from the request and delegates the business logic to the service layer.
const getAllUsers = async (
  req: Request,
  res: Response,
  next: NextFunction,
) => {
  try {
    const userId = req.userId;

    if (!userId) {
      throw ApiError.unauthorized("Unauthorized User");
    }

    const data = await userService.getAllUsers(userId);

    ApiResponse.ok(res, "Users fetched successfully", data);
  } catch (error) {
    next(error);
  }
};
Service Layer
Inside the service layer, I used MongoDB's $ne (not equal) operator to exclude the currently logged-in user from the results.
const getAllUsers = async (userId: string) => {
  const users = await userModel
    .find({
      _id: { $ne: userId },
    })
    .select("_id firstName lastName email");

  return {
    users,
  };
};
The .select() method ensures that only the required fields are returned, avoiding unnecessary data exposure.
Example Response
{
  "success": true,
  "message": "Users fetched successfully",
  "data": {
    "users": [
      {
        "_id": "6845c9b8f1e8a2d4e6a1b001",
        "firstName": "Ankit",
        "lastName": "Singh",
        "email": "ankit@example.com"
      },
      {
        "_id": "6845c9b8f1e8a2d4e6a1b002",
        "firstName": "Rahul",
        "lastName": "Kumar",
        "email": "rahul@example.com"
      }
    ]
  }
}
Checking Account Balance
After implementing money transfers, I added a dedicated endpoint that allows authenticated users to retrieve their current account balance.
Route
The endpoint is protected by authMiddleware, ensuring that only authenticated users can access their balance information.
router.get("/checkBalance", authMiddleware, controller.checkBalance);
Controller
The controller extracts the authenticated user's ID from the request and delegates the balance lookup to the service layer.
const checkBalance = async (
  req: Request,
  res: Response,
  next: NextFunction,
) => {
  try {
    const userId = req.userId;

    if (!userId) {
      throw ApiError.unauthorized("Unauthorized User");
    }

    const data = await accountService.checkBalance(userId);

    ApiResponse.ok(res, "Balance fetched successfully", data);
  } catch (error) {
    next(error);
  }
};
Service
The service searches for the user's account using the userId stored in the account collection. If the account exists, the current balance is returned.
const checkBalance = async (userId: string) => {
  const account = await accountModel.findOne({
    userId,
  });

  if (!account) {
    throw new ApiError(404, "Account not found");
  }

  return {
    balance: account.balance,
  };
};
Example Response
{
  "success": true,
  "message": "Balance fetched successfully",
  "data": {
    "balance": 1250
  }
}
Final Result: Testing /v1/account/checkBalance API Using Postman

Final Thoughts
In this tutorial, we built a complete Paytm-style payments backend using Bun, TypeScript, Express, and MongoDB.
hroughout the project, we implemented:
User registration and authentication
JWT-based access and refresh tokens
Protected routes with middleware
User profile retrieval
Fetching all users except the logged-in user
Secure money transfers between users
Account balance checking
MongoDB transactions for data consistency
Structured architecture with controllers, services, models, and middleware
Source Code
The complete source code for this project is available on GitHub:
GitHub Repository:
https://github.com/shubhamsinghbundela/Payments-Backend-bun-typescript
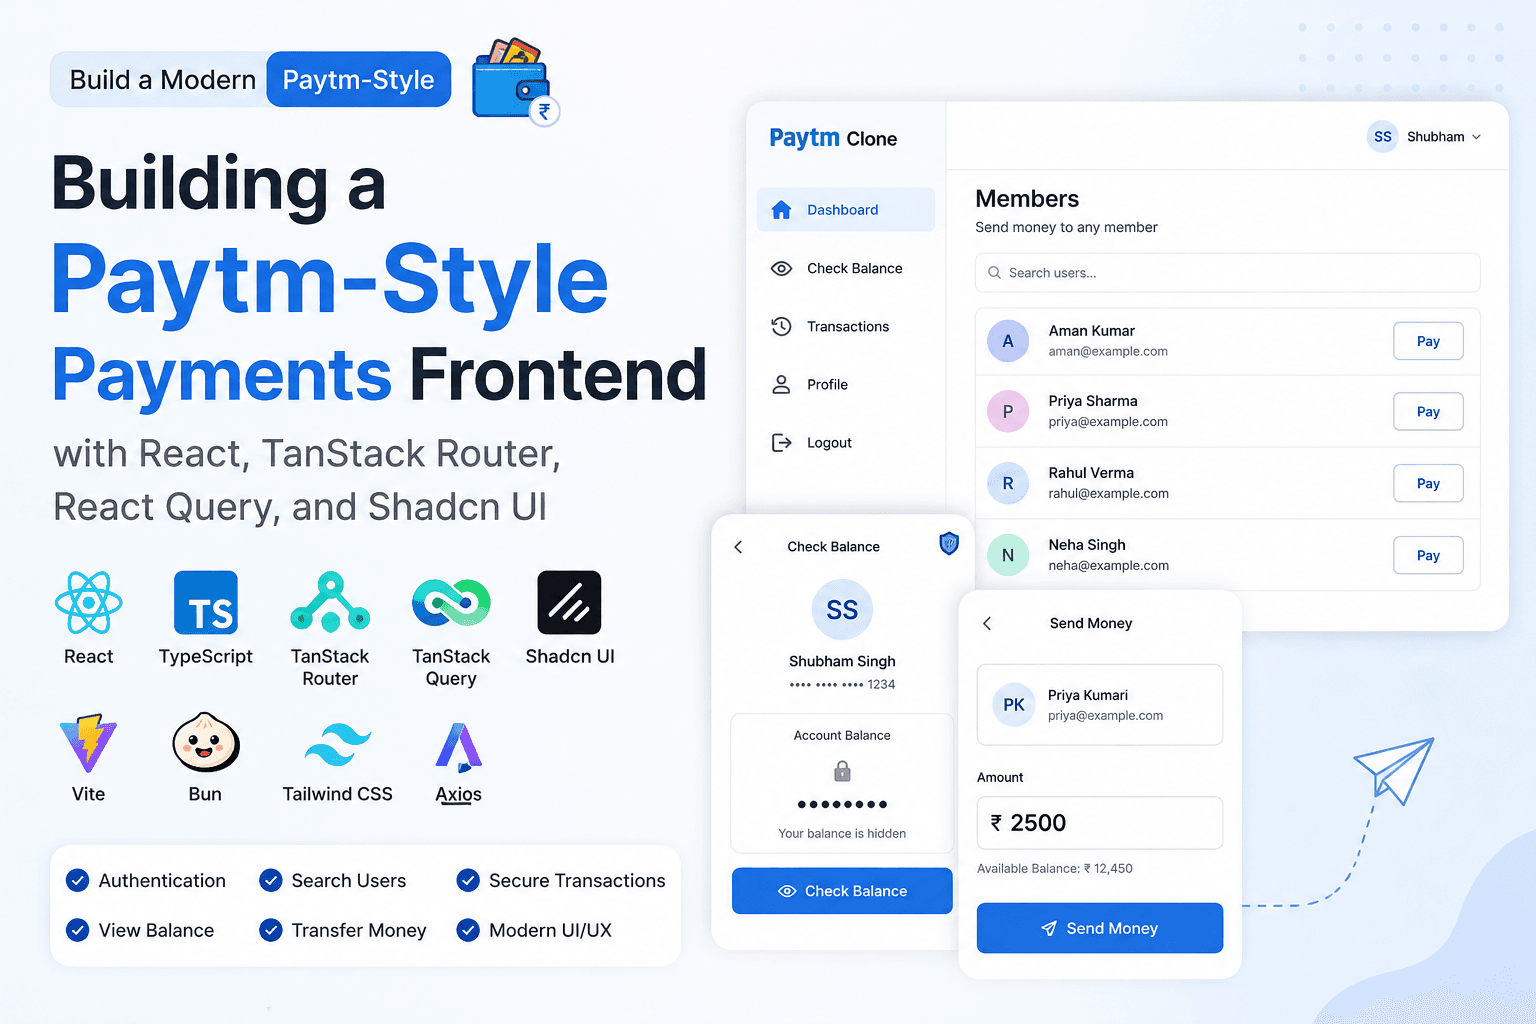
What's Next?
In the next article, we'll build the frontend application using:
React
TypeScript
TanStack Router
TanStack Query
React Hook Form
Shadcn UI
Tailwind CSS
The frontend will consume the APIs built in this backend and provide a complete Paytm-style user experience, including authentication, member management, money transfers, and balance checking.
Thanks for reading, and I hope this tutorial helped you understand how to build a secure payments backend with Bun, TypeScript, Express, MongoDB, and Transactions. 🚀